
Quick Summary
A field hospital setup starts by defining the level of care the facility must provide, since that decides layout, staffing and supplies. Next, select and prepare a site with access, drainage and utilities, then plan patient flow with separate triage, treatment and isolation areas. Finish with commissioning tests before accepting any patients.
- Define the level of care first: stabilization only, surgical and emergency, or full inpatient care.
- Choose a site with road access, level ground, drainage and access to water and power.
- Keep patient flow linear and separate triage, treatment and isolation areas from the start.
- Size primary and backup generators for essential loads and check fuel resupply against the schedule.
- Commission and test all systems and run mock patients before the facility admits anyone.
Table of Contents
- What a Mobile Field Hospital Must Do and the Level of Care It Needs to Provide
- Site Selection and Site Preparation for a Field Hospital Setup
- Field Hospital Layout: Patient Flow, Clinical Zoning and Space Optimization
- Field Hospital Infrastructure Requirements: Shelter, Power, Water and HVAC
- Medical Equipment, Supplies and Logistics for Rapid Deployment
- Mobile Field Hospital Deployment Timeline and Setup Sequence
- Field Hospital Setup Checklist with Roles and Decision Gates
- Clinical Commissioning, Infection Prevention and Readiness Testing
- Planning for Resilience, Redundancy, Staffing and Handover
- Requesting a Quote for Temporary Infrastructure Support for Your Field Hospital
- Frequently Asked Questions
What a Mobile Field Hospital Must Do and the Level of Care It Needs to Provide
Last Updated: November 7, 2026
A mobile field hospital is a temporary medical facility built to deliver care where permanent hospitals cannot operate, whether after a natural disaster, during a pandemic, or in response to a mass casualty event.
Start with the mission. Our rapid-deployment units for medical and healthcare response are built around these care requirements.
Define the level of care before you specify anything else. Many deployments fall into one of three tiers: stabilization and triage only, surgical and emergency care, or full inpatient care with diagnostics.
Build the mission requirements around patient volume and acuity. Estimate the expected number of patients per day, the share likely to need beds, and the share that will need critical care.
Equally important is what the facility will not do.
Finally, confirm the mission with the clinical leads and the agencies that will receive referrals. A field hospital is only as useful as its connection to the wider health system, and an agreed mission statement is the document that makes those connections work in practice.
Site Selection and Site Preparation for a Field Hospital Setup
Site selection determines whether a field hospital can be operational on schedule. A common mistake is choosing a location for its proximity to the disaster zone while overlooking access roads, drainage and ground stability.
Evaluate candidate sites against a short list of practical criteria: road access for heavy transport, level ground that can carry the weight of tents or containers, drainage that avoids standing water, distance from hazards such as flood plains or fuel storage, and access to water and power connections or generator fuel supply.
Site preparation usually takes longer than teams expect. Explore turnkey base camp solutions that come with the site infrastructure already planned. Clearing vegetation, levelling the ground, grading for drainage and laying gravel or temporary flooring all need time and equipment.
Consider the site's ability to support the people working there as well as the patients. Staff accommodation, parking, vehicle turning areas and a secure perimeter all need space. Review sleeping quarters that keep teams rested and ready for the staff who run the site.
Document the site survey with photographs, ground condition notes and utility locations. These records help during setup, support insurance and handover, and give relief agencies a reference if the site is needed again.
Field Hospital Layout: Patient Flow, Clinical Zoning and Space Optimization
Layout is where clinical logic meets physical space. A well-designed field hospital moves patients in one direction, from arrival through triage and treatment to recovery or transfer, and keeps clean and contaminated areas apart. Poor layout creates bottlenecks at the entrance, cross-contamination between wards and wasted walking time for staff.
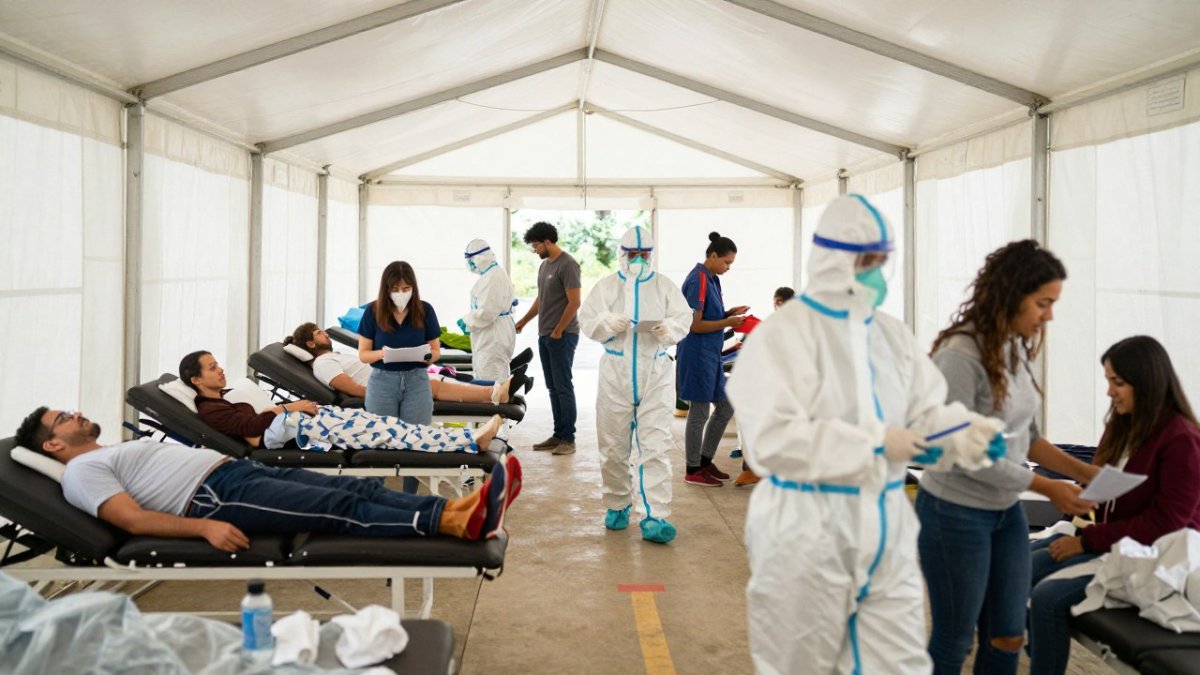
Begin with patient flow. Map the journey of a typical patient from arrival to discharge, then translate that route into a sequence of zones. Keep the route as linear as possible. Where a loop is unavoidable, make sure it does not cross the path of incoming patients.
Clinical zoning groups related functions together. Typical zones include an arrival and decontamination area, triage, emergency treatment, surgical or procedure space, inpatient wards, a pharmacy and supply store, and a staff rest area. Each zone should have a clear boundary and a defined entry and exit point.
Space optimisation is a trade-off. Corridors need to be wide enough for stretchers and wheelchairs, usually at least a metre and a half, but every extra metre of corridor reduces usable clinical space. Test the layout with a mock-up using tape on the ground and walk through the patient journey with clinical staff.
Separating Triage, Treatment and Isolation Areas
Separating triage, treatment and isolation is one of the most important safety decisions in a field hospital. Triage should sit at the entrance so that patients are assessed quickly and directed to the right area. It needs its own space, visible from the arrival route, with enough room for stretchers to be held while waiting for beds.
Treatment areas should be grouped by acuity. Keep critical patients close to the resuscitation and surgical zone, and place stable patients in a separate ward. This reduces travel time for the sickest patients and frees specialist staff to focus where they are most needed.
Isolation requires dedicated space that is physically separate from the general treatment area, with its own entrance, airflow considerations and waste route. Infection control is covered in more detail later in this guide, but the layout must allow isolation to be established from the start. Retrofitting isolation into a finished layout is rarely successful.
Field Hospital Infrastructure Requirements: Shelter, Power, Water and HVAC
Infrastructure is the foundation that everything else depends on. Shelter options include tents, modular containers and hybrid structures that combine both. Tents are fast to erect and transport, but they offer less thermal and acoustic control.
Power is the single most critical utility. Plan for a primary generator supply with a backup generator sized to run essential loads, including lighting, medical equipment, refrigeration for vaccines and medicines, sterilisation and communications.
Water supply covers both drinking water and water for clinical and sanitation use. Estimate daily consumption per patient and per staff member, then add capacity for handwashing, cleaning and laundry. Storage tanks, treatment units and distribution lines all need to be specified together.
Heating, ventilation and air conditioning control temperature, humidity and air quality. Operating areas, isolation rooms and pharmacies have specific environmental requirements that must be met regardless of the outside climate. In hot climates, cooling loads can be significant, and the generator sizing must account for them.
Plan for failure. Each utility should have a defined fallback, and the team should test switchover before the facility opens. Document the shutdown and restart procedures so that staff can respond quickly if a system fails during operation.
Medical Equipment, Supplies and Logistics for Rapid Deployment
Medical equipment must match the level of care defined in the mission. A stabilisation-only facility needs monitors, oxygen supply, suction, basic diagnostics and resuscitation equipment. A surgical facility adds operating tables, anaesthesia machines, sterilisation equipment and imaging.
Supplies are often the first thing to run short. Organise supplies into categories such as consumables, pharmaceuticals, blood and fluids, linen and personal protective equipment. Set minimum stock levels for each category and agree who is responsible for monitoring them. Plan feeding for responders with dining hall units for humanitarian and emergency operations.
Logistics governs how equipment and supplies reach the site. Transport planning should consider road conditions, border or customs requirements, vehicle capacity and the weight and dimensions of each shipment. Pack items so that they can be unloaded in the order they are needed for setup, rather than simply by category.
Cold chain management is a common gap. Vaccines, some medicines and blood products require controlled refrigeration from the point of storage to the point of use. Plan the cold chain end to end, including backup power for refrigerators, temperature monitoring and alarm procedures.
Mobile Field Hospital Deployment Timeline and Setup Sequence
A realistic timeline helps teams plan staffing, transport and handover. The exact durations depend on the size of the facility, the terrain and the availability of equipment, but the sequence below reflects how most deployments unfold.
Begin with mobilisation, which covers confirming the mission, selecting the site, arranging transport and assembling the core team. Site survey and preparation follow, with ground works, drainage and utility routing running in parallel.
Commissioning comes after fit-out and before patients arrive. This includes testing power and water, verifying medical equipment, running fire and safety checks and walking through each clinical zone with staff. The facility should not accept patients until commissioning is signed off.
Use a sequenced timeline with clear dependencies. For example, the power system must be tested before refrigeration is loaded, and water must be confirmed before sterilisation begins. Visualising these dependencies on a simple Gantt chart helps the team see where delays will ripple through the schedule.
Build contingency into every phase. Weather, transport delays and equipment faults are routine, not exceptional. A timeline that assumes everything runs perfectly will fail on the first day of real deployment.
The setup sequence runs in phases, each with a typical role in the timeline:
|
Phase |
What happens |
Note |
|---|---|---|
|
Mobilisation |
Confirm mission, select site, arrange transport, assemble core team |
Begins the timeline |
|
Site preparation |
Ground works, drainage and utility routing run in parallel |
Confirm ground is ready before erecting units |
|
Shelter erection |
Largest units erected first, defining the layout |
Sequence follows layout |
|
Utilities and fit-out |
Power, water and clinical fit-out installed and tested |
Test power before loading refrigeration |
|
Commissioning |
Power, oxygen, sterilisation and communications checked |
No patients until signed off |
Field Hospital Setup Checklist with Roles and Decision Gates
A checklist turns the setup sequence into actions that people can follow under pressure. The checklist below groups tasks by phase and assigns a responsible role. Each phase ends with a decision gate, a point where the team confirms readiness before moving on.
Phase 1: Mobilisation
- Mission and level of care confirmed by clinical lead
- Site selected and approved by operations lead
- Transport booked and route confirmed by logistics lead
- Core team assembled and briefed
- Decision gate: Clinical lead and operations lead approve the site and mission before ground works begin.
Phase 2: Site preparation
- Ground cleared, levelled and drained by engineering lead
- Utility connection points marked and verified
- Perimeter, access roads and parking confirmed
- Decision gate: Engineering lead signs off ground condition before structures are erected.
Phase 3: Structure and utilities
- Shelter units erected in layout sequence by site team
- Power, water and HVAC installed and tested by engineering lead
- Wastewater and waste routes confirmed by infection control lead
- Decision gate: Power and water tested under load; engineering lead confirms utility readiness.
Phase 4: Fit-out and supply
- Medical equipment installed and calibrated by clinical engineer
- Supplies stored in designated locations by pharmacy lead
- Cold chain verified and temperature alarms tested
- Decision gate: Clinical lead confirms each zone is equipped to the defined level of care.
Phase 5: Commissioning and handover
- Commissioning tests completed and documented
- Staff walkthrough of all zones completed
- Handover documents issued
- Decision gate: Facility director signs off readiness and authorises patient admission.
Assign a named individual to each role before deployment begins. Overlapping responsibilities cause dropped tasks, so make sure each checklist item has one owner.
Clinical Commissioning, Infection Prevention and Readiness Testing
Clinical commissioning is the formal process of proving that the facility works as designed before patients arrive. It goes beyond checking that equipment switches on. Commissioning tests the complete system: power holds under load, oxygen reaches every bed, sterilisation achieves the required cycle, and communications work between zones.
Readiness testing should include simulated scenarios. Run a mock patient through the full journey from arrival to discharge, timing each step and noting any delays or confusion. Simulate a utility failure and confirm that the fallback works and staff know what to do.
Infection prevention needs its own attention during commissioning. Confirm handwashing stations, waste segregation bins and personal protective equipment supplies are in place and accessible. Check that isolation spaces have the correct airflow and that staff know the entry and exit procedures.
Patient flow controls are the operational side of infection prevention. Define one-way routes where possible, restrict access to clean areas, and set rules for visitors. Staff should know which zones require gowns, masks or gloves, and these requirements should be shown clearly on signage.
Document commissioning results with dated records and signatures. These records become the baseline for ongoing performance monitoring and provide evidence if the facility is inspected or audited.
Planning for Resilience, Redundancy, Staffing and Handover
Resilience means the field hospital can keep functioning when something goes wrong. Redundancy is the practical means of achieving it: duplicate power supplies, spare equipment for critical functions, and secondary water sources.
Staffing is often the constraint that limits operations. Plan rosters that allow staff to rest, because fatigue degrades clinical performance and safety. Define minimum staffing levels for each zone and identify cross-trained staff who can cover gaps.
Failure planning should cover the scenarios that would most damage operations: loss of power for an extended period, a surge in patient numbers beyond capacity, a supply interruption, or a security incident. For each scenario, define the trigger, the response and the person responsible for decisions.
Handover is the transfer of the facility from the deployment team to the receiving organisation, whether a local health authority, a partner agency or a follow-on team. A good handover includes the site records, equipment inventory, maintenance schedules, outstanding issues and contact details for key suppliers.
Decommissioning and relocation also belong in the plan.
Requesting a Quote for Temporary Infrastructure Support for Your Field Hospital
Pricing for temporary infrastructure depends on quantity, dates, site conditions, delivery distance and the level of fit-out required, so there is no single standard figure to quote here. The most reliable way to get an accurate estimate is to send a clear brief covering the mission, the level of care, the number of beds and clinical zones, the target deployment window, and the site conditions as far as they are known.
FlexTC delivers temporary and semi-permanent structures, turnkey base camps and sleeping and dining facilities built to client specifications. Requirements can be reviewed with the FlexTC team to discuss the configuration that fits your site and timeline. To request a quote, contact FlexTC with your brief and the details above, and we will respond with a proposal tailored to your deployment.
Frequently Asked Questions
What are the first steps in setting up a mobile field hospital?
Start with a mission requirements statement: the level of care to be provided, expected patient volume, and how long the facility must operate. From that, confirm the site, the power and water sources, and access for transport vehicles. Only after these are fixed should layout, equipment and staffing be planned. Skipping the mission definition is the most common cause of later redesigns, because every downstream decision depends on the capacity and care level chosen at the start.
How do you choose a site for a temporary field hospital?
Look for level, well-drained ground with room for the planned footprint plus expansion and vehicle turning. Check access roads for heavy transport, distance to a water source, and whether ground conditions allow the foundations or anchoring you need. Avoid flood plains and areas exposed to hazards that the mission could not survive. Document the site assessment so the handover and any later relocation have a clear baseline.
How long does it take to set up a mobile field hospital?
Deployment time depends on the facility size, the shelter type, the terrain, and how much of the utilities and equipment are pre-staged. Modular and containerized units generally go up faster than tent-based systems, but site preparation often becomes the limiting factor. Build a sequenced timeline with decision gates, and treat any published figure as a planning estimate to be checked against your own site and resources.
What should be included in a field hospital handover checklist?
A handover checklist should record the equipment inventory and its condition, utility system settings and shutoffs, infection control procedures in place, staffing rosters with responsibilities, and any open maintenance or safety issues. Include the readiness test results and the commissioning sign-off so the receiving team knows what has been verified. Store the checklist with the site documentation so it is available for inspection and future deployments.


